Upgrading to the Latest Version of Syniti Replicate
If you have DBMoto V8 or Syniti Replicate V9 installed, the upgrade process involves running a new setup and applying a new license key. For earlier versions of DBMoto, contact our technical support team via the Help Center.
-
Download the latest Syniti Replicate version as directed by the support staff.
-
Make sure that you obtain your new license key (if needed) before starting the installation process. Contact your account manager if you encounter issues with your license key.
Note: In previous versions of Syniti Replicate and Syniti Data Replication, Syniti recommends using SQL Server Express Edition 2019 or 2022 as a local database.
Note: Before upgrading to Syniti Replicate 10.3 or later from any earlier version, complete the following steps:
- Stop the Replication Agent/Data Replicator of the current version of Syniti Replicate.
- Open the Management Center and select the metadata node.
- Back up the metadata. Metadata backup is not only important to keep a copy of the current metadata settings: it also commits any pending changes that are waiting to be saved in the metadata database that may be lost when a product upgrade is performed.
- Close the Management Center.
- Stop the Server Agent.
-
Run the setup.exe.
-
If you are installing Syniti Replicate over an existing installation of DBMoto or Syniti Replicate, a dialog box is displayed with the following text:
An older version of Syniti Replicate has been detected on this computer. Click YES to Upgrade to the latest version. -
Click Yes to proceed with the installation. Click No to exit the installation.
-
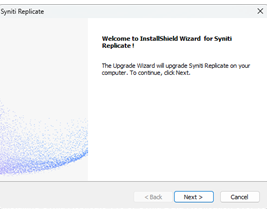
A wizard guides you on the installation process. Click Next.
-
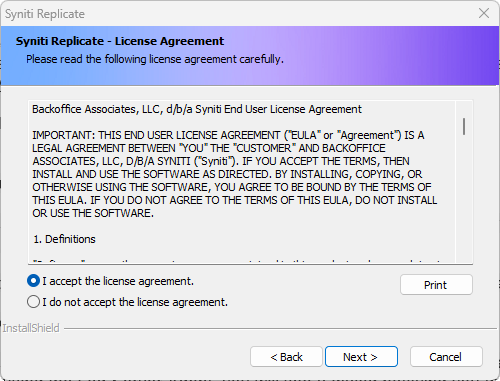
Read the license agreement. Select the option “I accept the license agreement” to continue with the installation and click Next.
-
Select the folder where the setup will install files. If you leave the folder by default, the setup will replace your current directory name.
-
There are two installation options:
Standard Installation: Installs Management Center, Server Agent and Replication Agent.
Management Center Only: Installs only the Management Center component, used for managing and monitoring remote installations of Syniti Replicate.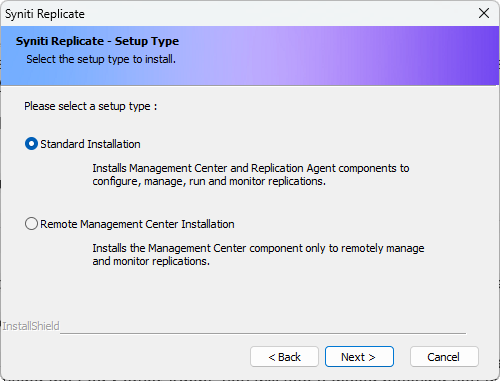
Select the Standard Installation option. -
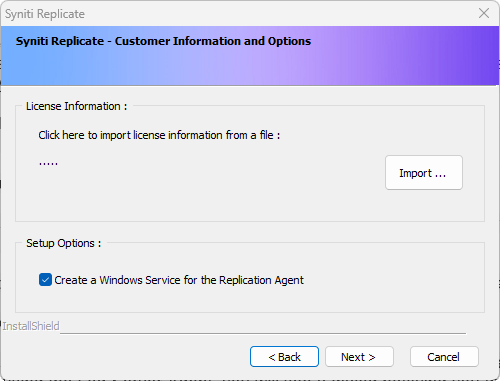
Import a valid license for Syniti Replicate 10 and select a digital signature verification option. Contact your account manager if you encounter issues with your license key.
If you are installing Syniti Replicate v10 or Syniti Data Replication over v9.0, and you have set up replications using the Log Server Agent, you will see a dialog notifying you that services are running. Log Server Agent services are typically named with the prefix DBMoto_LSA_.
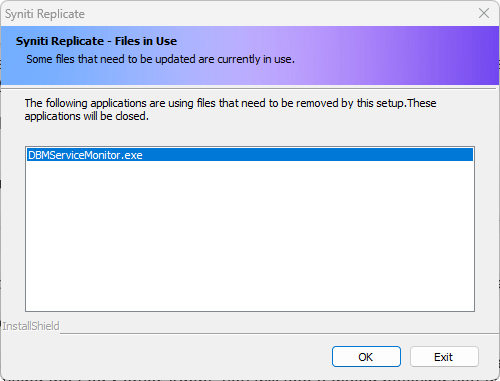
- Click OK to stop the services.
-
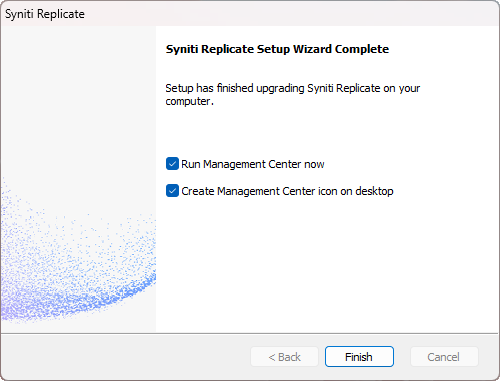
Continue with the installation until complete and confirm the process.
-
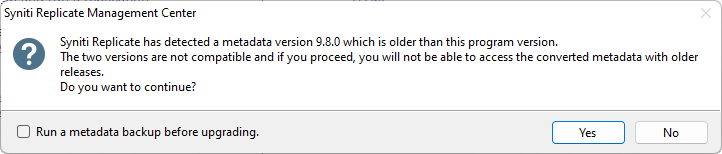
If the below dialog box is displayed, check the option to Run a metadata backup before upgrading, unless you have already made an up-to-date backup of your metadata.
-
If your previous metadata was installed by default, you will receive a reminder message that you have to create a connection for your new metadata.

-
Follow the steps to create Metadata in a Relational Database.
-
You are now ready to run the Management Center and explore features in the new release.
-
If you were using Log Server Agent services in DBMoto V9, go to the Windows Task Manager Services tab to restart the services that were created during Log Server Agent setup.
-
If you are using IBM Db2 for i as one of your source connections, you may also see a dialog about updating the DBMOTOLIB. Take the following steps after installation is complete.
-
Start the Management Center, then view the Connection Properties for your IBM Db2 for i connection.
-
In the Transactional Setup field, right click and choose Manage... from the menu.
-
Click Verify to check the setup status. You should receive a dialog with the confirmation message "The setup library for the IBM i /AS400 is installed."
IMPORTANT: The services created for the Log Server Agent are not started automatically following installation of Syniti Replicate 10. You must start these services manually.
Create Metadata in a Relational Database
To create metadata:
-
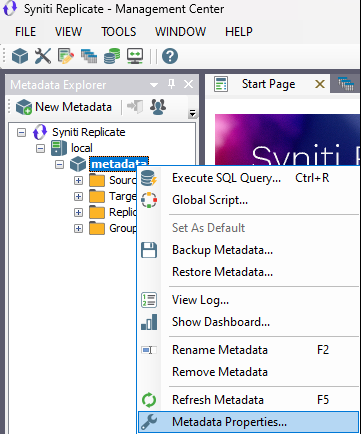
Open the Management Center. On the Metadata Explorer, right click the Metadata node.
-
Select Metadata Properties…
-
On the Metadata Connection Properties dialog, open the connection properties.

-
On the connection properties, add this information:
-
Select the database for which you want to create a connection. This database could be a local or remote system hosted on the same network.
-
Select a .NET data provider from the list. .NET providers are preferred over ODBC drivers or OLE DB providers because Syniti Replicate is a .NET application, and it can take advantage of the use of native .NET providers based on the same architecture. If you use ODBC or OLE DB connections, the .NET framework must add a software layer for every call you make to the driver, adding overhead. If you use 100% managed .NET providers, there is no risk of memory leaks because the .NET framework cleans up memory automatically using an internal garbage collector.
-
Assembly is displayed only if using a .NET data provider, and the provider has not been registered. Provide a path to the .NET data provider DLL. (See a list of providers in the Help Center).
-
Set a connection string to the database.
-
Click Test to make sure that the connection correctly opens a database connection.
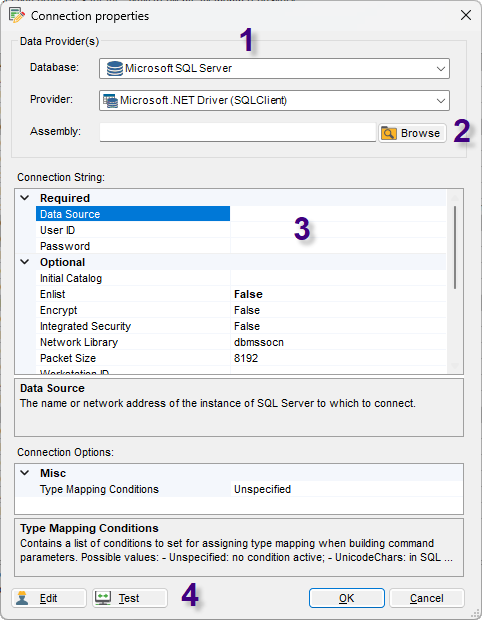
-
- Click OK and return to the Metadata Connection Properties.
NOTE: If you want to select a specific schema or catalog for your metadata, add a Qualifier under Connection Properties. If you do not select values for these fields, the default qualifiers will be used based on the connection properties provided.
-
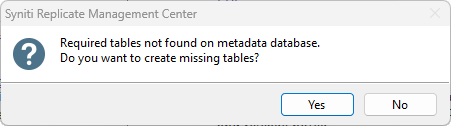
A message displays confirming the table creation for your metadata, according to the information entered on the Metadata Properties. Click Yes.
Now your Metadata is ready to be restored from your Backup:
- Open the Management Center, on the Metadata Explorer and right click.
- Select Restore Metadata…
- You can select between a Standard Restore or a Custom Restore. Select your preference.
- Once the process is complete you will receive a confirmation message.
