Steps for Replicating with Synchronization
1. Set Up Database Connections
-
Make sure you have database connections via a .NET data provider to the supported databases for source database tables and target database tables.
-
Start the Management Center.
Syniti Data Replication provides a default database (Microsoft SQL Server CE) for your metadata, all the information that Syniti DR needs to store about your replication setup.

-
In the Metadata Explorer, expand the metadata node to view the Sources and Targets nodes.
For tables involved in a synchronization, both tables serve as source and target tables. Changes to Table A (source) can cause Table B to be updated (target), but changes to Table B (source) can also cause Table A (target) to be updated. When defining a synchronization in Syniti DR, you need to specify one connection as the source connection and one connection as the target connection although they will both be used for source and target operations. Note that if the replication involves tables that have not yet been created, you should set the connection for the new tables as the target connection so that you can use Syniti DR to create the tables based on tables defined in the source connection. -
Select the Sources node.
-
From the right mouse button menu, choose Add New Connection.

-
In the Add Source Connection Wizard, follow steps to add a connection string and test the connection to the database.
Check the Supported Provider List in the Help Center before entering a value in the Assembly field.
Note that the login/user ID that you provide must be unique to Syniti DR. It should not be used for any transactions occurring in either database involved in the synchronization. Syniti DR does not replicate transactions by the user you specify in this connection. This user ID is used by Syniti DR during synchronization to read the database logs and perform the synchronization operations. Therefore, any transactions found in the logs with this user ID are not replicated as part of the synchronization data.
-
In the Select Tables screen, choose the tables that you plan to replicate.
-
In the Actions screen, check the option Launch the Enable Transactional Setup Wizard.

-
Complete the wizard.


2. Enable Transactional Replication
This section assumes you have checked the Source Connection wizard option to launch the Enable Transactional Replication wizard. If not, to open the wizard from the Management Center, choose the connection in the Metadata Explorer, then right-click to choose Transactonal Setup > Enable...
In the Enable Transactional Replication wizard:
-
Select the type of transactional replication to use. The options depend on the source database and can include log reader, log server agent, triggers, plus log reader API (for IBM Db2 for i only)

- Click Next
to enter the log settings. The fields and appropriate values depend
on the database
and log type.

- Click Next to verify your settings against the source connection to the database. If any information is missing, you will not be able to proceed.
-
In the Actions screen, check the option Launch Add Target Connection wizard.
-
Click Next to review your changes.
-
Click Finish to complete the wizard.
The source connection is now set up for transactional replications.
3. Set Up Target Database Connection
This section assumes you have checked the Add Target Connection wizard
option to launch the Add Target Connection wizard. If not, to open the
wizard from the Management Center, choose Targets
in the Metadata Explorer, then right-click to choose Add
New Connection...
-
In the Add Target Connection Wizard, follow steps to add a connection string and test the connection to the database. Check the Supported Provider List in the Help Center before entering a value in the Assembly field.
Note that the login/user ID that you provide must be unique to Syniti DR. It should not be used for any transactions occurring in either database involved in the synchronization. Syniti DR does not replicate transactions by the user you specify in this connection. This user ID is used by Syniti DR during synchronization to read the database logs and perform the synchronization operations. Therefore, any transactions found in the logs with this user ID are not replicated as part of the synchronization data.
-
Choose the tables to which you plan to replicate.
If the table does not exist, continue to the next screen without selecting a table. -
Complete the wizard.

4. Create a Target Table
If the target table does not exist, use the Create Target Table wizard to create the table.
- In the Metadata Explorer, drag the source table to the
target connection to open the Create Target Table wizard.
The Select Source Connection screen is already filled out with the table you selected.,
-
If you want more information about the table before proceeding, click Open Table....
-
Click Next to go to the Select Target Connection screen.
The screen fields have already been completed with the target connection details.
-
Click Next to go to the Define Columns screen.

-
Review the columns that will be created in the target table. You can add or remove columns as well as designate one or more columns as a primary key.
-
When you have finished editing the target table columns, click Next to go to the SQL Script screen.

-
If necessary, edit the SQL script that generates the table.
-
Click Next to display the Actions screen.
-
To create additional tables, check the Launch Create Target Table wizard option.
This opens another Create Target Table wizard when this wizard is complete. -
To go directly to creating a replication once this wizard is complete, check Launch Create Replication wizard option.
This opens the Replication wizard when the Create Target Table wizard is complete. -
Click Next to view a summary.
-
Click Finish to create the target table.
-
Note that the new table is not automatically displayed in the Metadata Explorer. Click Yes to add the newly created table to the list of target tables in the Metadata Explorer.


5. Enable Target Transactional Replication
- Choose the target connection in the Metadata Explorer, then right-click to choose Transactional Setup > Enable...
-
In the Enable Transactional Replication wizard, select the type of transactional replication to use. The options depend on the source database and can include log reader, log server agent, triggers, plus log reader API (for IBM Db2 for i only)
-
Click Next to enter the log settings. The fields and appropriate values depend on the database and log type.
-
Click Next to verify your settings against the source connection to the database. If any information is missing, you will not be able to proceed.
-
In the Actions screen, check the option Launch Create Replication wizard.
-
Click Next to review your changes.
-
Click Finish to complete the wizard.
The target connection is now set up for synchronization with the source database.
6. Define the Replication
This section assumes you have checked the Create Replication wizard option to launch the Create Replication wizard. If not, to open the wizard from the Management Center, choose the table you want to replicate in the Metadata Explorer, then right-click to choose Replication > Create New Replication...
-
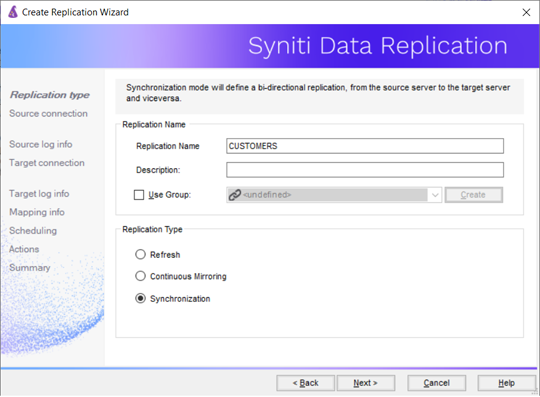
In the Define Replication Type screen, type a name to identify the replication.
-
Optionally provide a description of the replication.
-
In the Replication Mode area, choose Synchronization.

-
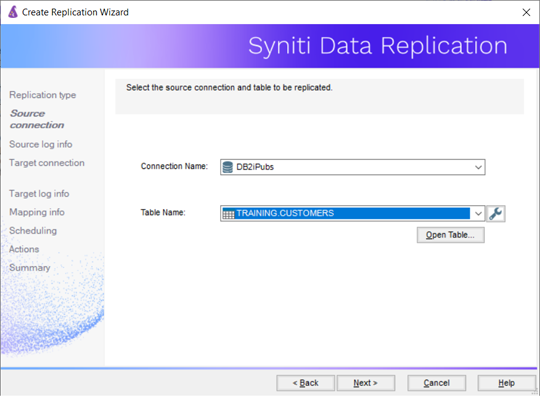
Click Next to go to the Select Source Connection screen.

-
Choose the source name from the drop-down list that includes all the source connections you have created.
-
Choose the table that you want to replicate from the drop-down list.
-
If you want more information about the table before proceeding, click Open Table....
-
Click Next to go to the Source Log Info screen.

The first two fields on this screen depend on the source database you are using. In this explanation, we assume you are using IBM Db2 for i (iSeries or AS/400). Check the help for the Replication Wizard for details on the other databases.
The Journal field is automatically filled in by retrieving the information from Db2 for i. The Receiver field will be automatically filled in after setting the Transaction ID. You do not need to modify these fields. However, if the library that you have specified as a source is not journaled, you will need to ask your system administrator to journal the library. -
In the Transaction ID field, click Read to open the Read Point dialog.
-
Choose either the current transaction or a transaction ID based on a time and date.
-
Click OK to add the value to the Source Log Info screen.
-
Set the value of the Read Interval field to the frequency with which you want Syniti DR to check the transaction log for new events to mirror.
-
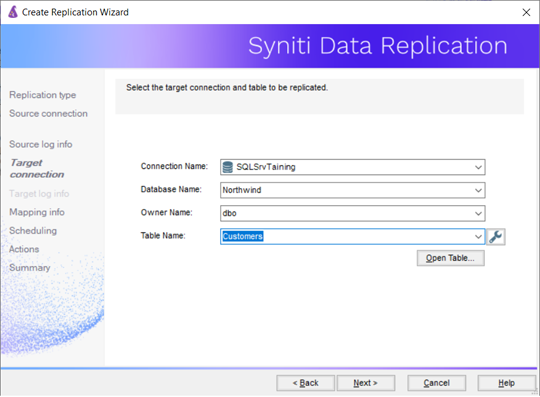
Click Next to go to the Select Target Connection screen.

-
Choose a target source name from the drop-down list that includes all the target connections you have created in Syniti DR.
-
Choose the table to which you want to replicate from the drop-down list.
If no tables are listed, you need to exit the wizard and add or create a target table. -
If you want more information about the table before proceeding, click Open Table....
-
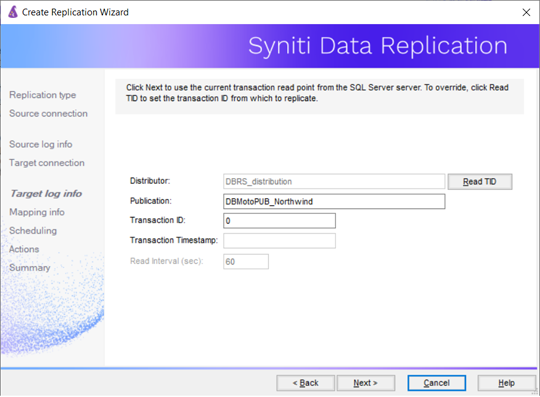
Click Next to go to the Target Log Info screen.

Note: If you encounter a connection error at this stage, check that you have used the appropriate IDs for your connections by going to the Connection Properties dialog for your source and target connections. For SQL Server, you need a non system administrator login for replication and a system administrator login for accessing the transaction log. -
In the Transaction ID field, click Read to open the Read Point dialog.
-
Choose either the current transaction or a transaction ID based on a time and date.
-
Click OK to add the value to the Target Log Info screen.
-
Set the value of the Read Interval field to the frequency with which you want Syniti DR to check the transaction log for new events to mirror.
-
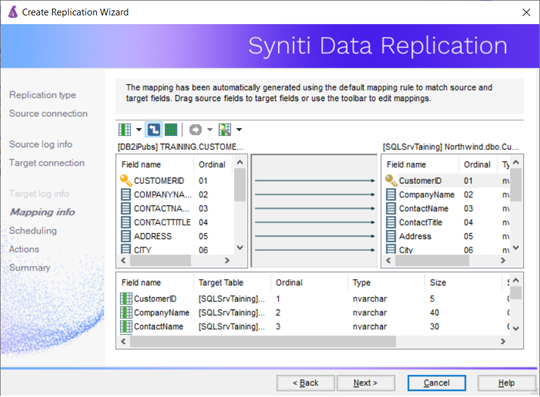
Click Next to go to the Set Mapping Info screen.

Source and target columns with the same name are automatically mapped. You can also map columns by dragging the target column and dropping it on the source column, or you can map a column to an expression. For more information about mapping, check the Replication Wizard help topic. An alternative is to write a script to set mappings at runtime. -
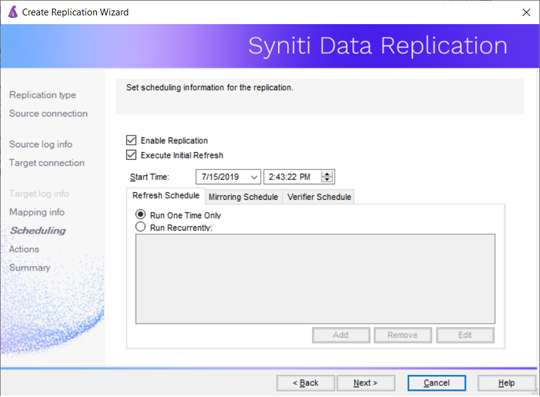
Click Next to go to the Scheduling screen.

-
Make sure the Enable Replication option is checked. This is required for the replication to run.
-
Set a start time for the replication. The Start Time field indicates the time at which the Replication Agent will begin considering the replication for execution.
-
Check the option to Execute Initial Refresh if needed.
If you check this option, a full replication will be performed from the source to the target table, prior to starting the sychronization process where only incremental changes will be replicated. The initial refresh is always performed from the source connection to the target connection. Note that any transaction submitted during the time that the refresh is running might not be replicated. It is strongly suggested that you avoid updating the designated source and target tables until the refresh is done. -
Go to the Mirroring Schedule tab.
-
Select how you want to run the replication:
-
Run Continuously: the transaction log will be checked for changes to the table using the frequency that you specified on the Set Log Info tab. Any changes will be replicated to the target table.
-
Schedule Interruptions: the replication process will run as above, except for interruptions specified when you click the Schedule button in the Scheduler dialog.
-

-
Click Next to go to the Summary screen.
-
Click Finish to complete the wizard.
4. Run the Replication
If you installed The Replication Agent as a service during
setup, you just need to start the service using the Service Monitor
program  in the Windows Notification
Area.
in the Windows Notification
Area.
The replication that you have scheduled should start at the specified time. Use the Replication Monitor tab in the Management Center to track the progress of the replication.
If you would like to install the Replication Agent as a service:
-
From the Windows Desktop menu, choose Syniti Data Replication, then Service Installer.
-
Manage the service from the Service Monitor program (located in the Windows Notification Area
, or on the Windows menu under Syniti Data Replication). -
Use the Replication Monitor tab in the Management Center to track the progress of the replication.
To run the Replication Agent interactively:
-
In the Windows Notification Area, select
the Service Monitor
icon. -
From the right mouse button menu, choose Replication Agent, then Start then Application.
The replication that you have scheduled should start at the specified time. -
Use the Replication Monitor tab in the Management Center to track the progress of the replication.