Replication Agent Options Dialog
General
Conversion Rules
Log
Trace
Alerts
Mail
Advanced
General
Max Number of Concurrent Threads
Sets the maximum number of replications that can run concurrently. The default is 20. Use the Preferences tab in the Replication Properties dialog to set priorities for the different replications. Use the Defaults button to set ALL Execution Settings back to the default values. See also Managing Performance Using Thread Settings
Thread Delay
The default value is zero. Use the Defaults button to set ALL Execution Settings back to the default values. See also Managing Performance Using Thread Settings
Thread Execution Factor
The default value is 10. Use the Defaults button to set ALL Execution Settings back to the default values. See also Managing Performance Using Thread Settings
Replication Settings: Perform an INSERT if the UPDATE doesn't find the record
Checked by default so that records are inserted in the target table even if the source table log specifies that the operation performed in the source table was an UPDATE.
Transaction Latency Threshold
The default value for this option is 1 minute. It is used with the Transaction Latency Chart in the Replication Activity Viewer. The chart compares the current time with the latest processed transaction time (or the last scheduled mirroring time if there are no transactions). If the lag between the two exceeds the Transaction Latency Threshold setting, the shaded area in the graph is displayed in red and the Latency Status column in the Replication Monitor displays the value Threshold Warning. This can indicate that the current settings for the Replication Agent and the replication are not allowing the Replication Agent to keep up with the number of transactions. Adjust the Transaction Latency Threshold value as needed to provide a useful warning for your environment, depending on the number of transactions and the mirroring interval.
Application Paths: Temporary Files Folder
Blank by default. In this case, Syniti DR temporary files are saved to the SyncCache folder. Type a new path to save temporary files to a different location.
Conversion Rules
Date/time conversion errors
Errors may occur when replicating date/time fields from one database to another. The accepted formats for this data type vary from DBMS to DBMS. For instance, IBM Db2 for i allows 1/1/1 as a valid date but Microsoft SQL Server does not. The options below allow you to control how such errors would be handled.
Don't Trap Error
No attempt is made to trap the error in the replication code so an exception is generated and added to the log (DBMoto.log.) No value is entered in the field where the error occurred and replication continues.
Insert NULL Value
NULL will be inserted in fields where the conversion generated an error. No information is reported in the log.
Insert the Minimum/Maximum Allowed
Depending on the database and the column data type, Syniti DR uses the minimum date allowed (if the date value was earlier than the minimum date setting for the database) or maximum date allowed (if the date value was later than maximum date setting for the database.)
Insert this Date
The selected date is inserted in place of the data that is causing an error. In general, the date is substituted, and the time (if any) is left unchanged. For example, if you have 1/1/1 11:30 it becomes 1/1/1900 11:30.
Log
The settings on this tab apply to the Syniti DR log (.log extension, viewable in the Log Viewer), the Syniti DR history files (.his extension, viewable in the History Viewer), and the Server Log (_SA naming convention.) This tab allows you to specify log type, location (if a database), size and generation frequency.
Log Settings
Click this button to open the Log Settings dialog.
Write Log To
You can save the Syniti DR log and history to one of the following. Your selection will be applied to both the log and history files.
Activate Log History
Check this option to start logging replication status information for each replication session. All information is recorded in a file with a .his extension in the Syniti DR Logs folder. This information can then be displayed and reviewed in the History Viewer.
You may want to leave this option unchecked if you are concerned about disk space and processing load for the Replication Agent. The process stores one record for each replication during each refresh/mirroring session. In the case of mirroring, this typically means that the .his file is updated every 60 seconds.
Activate Log Performance
Unchecked by default, When checked, generates a log file ('TaskTimer_<current_day>.txt) containing information for each replication or replication group regarding execution time, number of records processed and thread priority.
Database Log
Use Default Metadata
Select this option to create the log tables in the default (selected) metadata database.
Use Specific Connection
Select this option to create the log tables
in an alternative specified connection. Click ![]() to open the Log
Database Connection Properties dialog and set up a connection to the
database in which you plan to write the log.
to open the Log
Database Connection Properties dialog and set up a connection to the
database in which you plan to write the log.
Keep Max Log Messages
Check this option to set a specific number of messages to keep in the log database. This field allows you to control the seize of the log database and ensure that it does not get too large. The default value is 0, which means that all messages are kept in the database. Note that the value is in thousands. So, if you want to keep 5,000 records in the log, set the field value to 5.
Retention Time
Check this option to set a retention time for the number of hours to keep records in the log. Can be used in conjunction with Keep Max Log Messages.
Text File Log
Use the Log Viewer to access the log and save it to a file.
Only one file
Generates a single log file that includes all log messages occurring during replications.
One file every X days
If checked, and a number entered, generates a new log file after the number of days specified. All old log files are kept in the log directory. The convention used to name the log files is DBMoto_xxxx, where xxxx is a number starting at 0001. If you do not set the "Keep Max X Log Files" option, remember to clean up your log directory regularly.
One file with size limited to X Mb
If checked, and a number entered, creates a new log file when size X is reached. All old log files are kept in the log directory. The convention used to name the log files is DBMoto_xxxx.log, where xxxx is a number starting at 0001. If you do not set the "Keep Max X Log Files" option, remember to clean up your log directory regularly.
Keep Max X Log Files
If unchecked, all old log files are kept in the log directory. If checked, keeps only the specified number of old log files in the log directory. Use file dates (not file names) to determine the most recent log files.
Windows Event Log
Events are saved to the Microsoft Windows Event Log and can be viewed using the Windows Event Viewer, available from your Windows desktop by choosing Start, then Settings, then Control Panel. In the Control Panel, double-click Administrative Tools, then Event Viewer.
log4net
When you select the log4net option, by default Syniti DR writes events to a file using Apache log4net. You can configure log4net features by editing the log4net section in the SynitiDR_ReplicationAgent.exe.config file located in the Syniti DR install folder. It is recommended that you make a backup copy of the SynitiDR_ReplicationAgent.exe.config file before editing. For additional information about log4net features and settings, see http://logging.apache.org/log4net/release/features.html.
Trace
Activate Server Agent Tracing
For debug purposes only. Should be enabled only when requested by technical support staff. When checked, this option traces all activity related to the selected server. Stop and restart the Server Agent using the Syniti DR Service Monitor in the Windows System Tray to enable tracing.
Activate Replication Agent Tracing
For debug purposes only. Should be enabled only when requested by technical support staff. Click Settings to open the Replication Agent Trace Settings dialog. This dialog allows you to select the type of information to include in the trace. The following options are available:
Trace binary info read from the transaction
log (selected by default)
Trae diagnostic info
Trace low level database connectivity info (selected by default)
Trace metadata operations
Trace operations during replication refresh phase (selected by default)
Trace replication history info
Trace selected replications only (Click in the values field then on ![]() to open the Select Replications to Trace
dialog)
to open the Select Replications to Trace
dialog)
Trace threads and tasks info
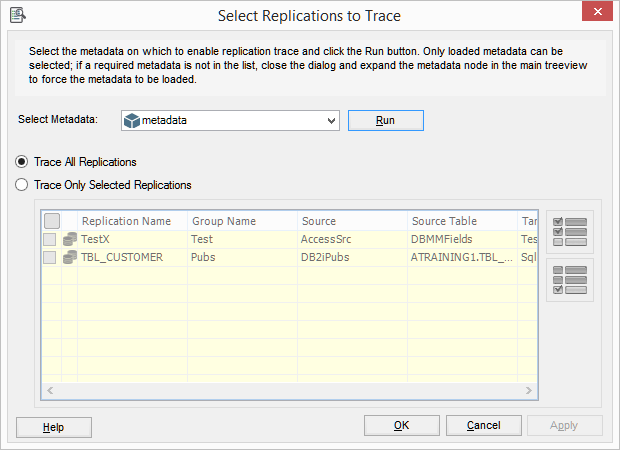
Select Replications to Trace Dialog
The "Trace selected replications only"
option, available from the Trace Settings dialog, allows you to limit
the number of replications to trace. Click in the values field, then on
![]() to open the Select Replications to Trace
dialog. You can either select specific replications, or select all replications
in a group to enable tracing for the group.
to open the Select Replications to Trace
dialog. You can either select specific replications, or select all replications
in a group to enable tracing for the group.
If you select all the replications in a group, then the whole group is traced. If you later add replications to the group, those replications will be traced as well. If you remove a replication from the group, the replication will no longer be traced.
Typically, you can leave the default settings. The tecnical support staff
will let you know if they need specific settings during tracing.
Only one file
Generates a single trace file that includes all trace messages occurring during replications.
One file every X days
If checked, and a number entered, generates a new trace file after the number of days specified. All old trace files are kept in the log directory. The convention used to name the Replication Agent trace files is DBMoto_xxxx.trc, where xxxx is a number starting at 0001. If you do not set the "Keep Max X Log Files" option, remember to clean up your log directory regularly.
One file with size limited to X Mb
If checked, and a number entered, creates a new trace file when size X is reached. All old trace files are kept in the log directory. The convention used to name the trace files is DBMoto_xxxx, where xxxx is a number starting at 0001. If you do not set the "Keep Max X Log Files" option, remember to clean up your log directory regularly.
Keep Max X Log Files
If unchecked, all old trace files are kept in the log directory. If checked, keeps only the specified number of old log files in the log directory. Use file dates (not file names) to determine the most recent files.
Alerts
Use this tab to create and manage email alert messages for the selected server (usually local). It provides a way to define email messages for specific events that apply to all replications that are enabled and/or to the status of the Replication Agent itself.
Replication Alerts Grid
The grid displays alerts that have been defined using the Add Alert button. Select an alert to edit or remove it.
Add Alert
Click Add Alert, then choose AddEvent Alert to define email message alerts for specific events in the Server Alert Properties dialog. Click Add Alert, then choose AddActivity Report to create general email message alerts for Replication Agent activity in the Server Alert Properties dialog. Note that newly defined email alert messages will only be sent after stopping and restarting the Replication Agent.
Remove Alert
Select an alert in the grid, then click Remove Alert to delete the email alert.
Edit Alert
Select an alert in the grid, then click Edit Alert to open the Server Alert Properties dialog and edit the email alert.
This tab is used in conjunction with the Alerts tab for server-related email alerts, the Alerts tab in the Replication Properties dialog for a specific replication and the SendMail script function. If you have defined an email alert, or a global or replication script that uses one of the SendMail functions, then you need to configure your SMTP email server and email address coordinates. Use the Test Email button to send an email and check your configuration.
SMTP Server
Type the SMTP server for the mail account from which you want to send emails.
SMTP Port
Type the port for the SMTP server.
From
Type your email address, or the email address from which you want to send emails.
To(s)
Type the email address(es) for the recipients of the email. Email addresses should be separated using a semi-colon (;).
Use Authentication
Check this option and provide a user name and password if the email server requires authentication.
Use SSL Encryption
Check this option if you are using SSL encryption.
Test Email
Click to send an email using the email addresses defined in the From and To fields above. The email will have the subject line "Test email from Syniti DR" and contain the text "This is a test. Ignore."
Advanced
The properties on this tab reflect values used by the Syniti DR configuration file. You do not typically need to edit these values, unless requested to do so by the technical support staff.
| Language | Default value is en-us. This is the selected language for the application. |
| Enable Console | Default value is False. enables the console to troubleshoot on Replication Agent status. |
| Agent IP Port | Default value is 58361. IP port for the Server Agent. |
| Agent Timeout | Default value is 180. Timeout (in seconds) for all commands from the Server Agent. |
| Agent Long Timeout | Default value is 300. Timeout (in seconds) for some commands in the Server Agent that typically take longer to complete. |
| Replication Agent IP Port | Default value is 58360. IP port for the Replication Agent. |
| Save Metadata Interval | Default value is 600. Interval (in seconds) used by the Server Agent to commit metadata changes to the database. |
| Metadata Path | Folder where pending metadata changes are saved. |
| Bulk Mirroring Temp Path | Folder for temporary files created by bulk mirroring. |
| Log DBM Prefix | Default value is _DBM__. The prefix used for log tables when replicating in trigger mode. |
| AS400 qcmdexc | Default value is qsys.qcmdexc. Syntax for the qcmdexc command to execute CL commands on the IBM I (AS/400) |
| DB2 UDB Log Version | Default value is 03. |
| Monitor Timeout | Default value is 15. Timeout in milliseconds for monitoring operations from the Serrver Agent to the Service Monitor. |
| Warning on Expiring License | Default value is 3. The number of days before license expiration to display a warning in the Management Center. |
| Replication Agent Timer Interval | Default value is 3000 (milliseconds). Sleep interval for the main thread of the Replication Agent. |
| Thread Sleep Length | Default value is 10. Length of time (in seconds) to sleep for the application multi-threading algorithm. |
| Thread Sleep Increments | Default value is 100. Increments (in seconds) of threads used by the application multi-threading algorithm. |
| Log Reader Tomeout | Default value is 0. timeout in seconds of the log reading process. |
Opening the Replication Agent Options Dialog
In the Management Center Metadata Explorer, select the server for which you want to set options. From the right mouse button menu, choose Replication Agent Option