Setting Up Users
NOTE: To establish or modify user profiles, you must be running the Management Center for a local installation of the server. It is not possible to modify user profiles for remote servers.
You can secure your Syniti DR environment by creating user profiles with appropriate access permissions to create, manage and modify connections and replications. When you first install and run the Management Center, a Windows service called Server Agent is started automatically and a connection is made between the Syniti DR Management Center and the local server (where both Syniti DRcomponents were installed.) The default name for this server appears as "local" in the Management Center. From the Management Center, you can set up restricted access to the server via user login IDs and user roles. Initially, Syniti DR is set up with security disabled, thereby avoiding the security mechanism altogether. To enable security and set up user profiles for the local server:
-
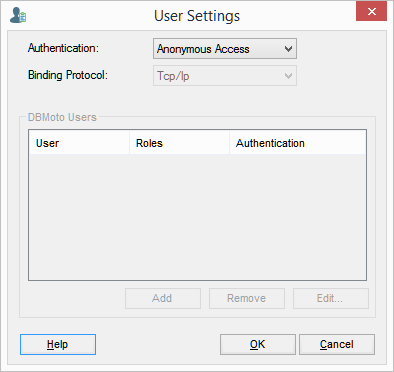
In the Management Center Metadata Explorer, select the local entry, and, from the right mouse button menu, choose Manage Users....
-
In the User Settings dialog, select the type of security you want to use.
Anonymous Access
Leave this option if you do not want to restrict access to Syniti DR in any way.
UserName Authentication
Allows you to establish login IDs and passwords for users, but also requires the installation of an X.509 certificate on the client system (where the Management Center is running).
Windows Authentication
Syniti DR uses your Microsoft Windows login and ID to control access to the Management Center and server agent.
Certificate Authentication
Requires the installation of an X.509 certificate but does not allow specific user login IDs.
For more information on security options in Syniti DR, see
Server Client Security Options.
NOTE: If you set up a user ID with
UserName Authentication, or Certificate Authentication, you will not be
able to use Syniti DR until the certificate is correctly installed. Generate
and install the certificate before setting up authentication.
-
Select the type of Binding Protocol to use.. For more information on appropriate binding protocols for use with Syniti DR, see Server Client Security Options.
|
Authentication |
Binding Protocol Options |
|
Anonymous Access |
Inactive. Uses TCP/IP binding protocol |
|
UserName Authentication |
TCP/IP or HTTP binding protocol. TCP/IP is suitable for intranet access, HTTP is recommended for internet access. |
|
Windows Authentication |
Inactive. Uses TCP/IP binding protocol |
|
Certificate Authentication |
TCP/IP or HTTP binding protocol. TCP/IP is suitable for intranet access, HTTP is recommended for internet access. |
-
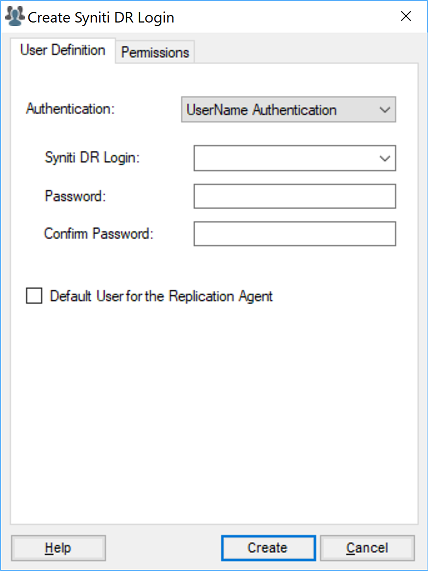
Click Add to open the Create Login dialog.
-
In the User Definition tab, check the Authentication type in the drop-down menu.
Windows Authentication
This option sets authority for a domain user. The default value in the Login field is the current Windows user login. This value can be edited. The password field is disabled in the dialog because the existing Windows password is expected.
UserName Authentication
This option allows you to set a user name and password that will subsequently be managed by Syniti DR. -
In the Permissions tab, select a User Role from the drop-down list.
The pre-defined roles set permissions for the types of operations that user would typically perform. You can customize the permissions for a user by selecting the value for the permission in the list, then choosing True or False from the drop-down list of values. Note that the role automatically becomes Custom in this case.
Administrator
Permission for all operations.
Auditor
Permission to audit and monitor replications.
Custom
Permissions selected manually.
NOTE: For security purposes, you may wish to set the Execute SQL Commands permission to False so that users are not able to run SQL commands other than SELECT from the SQL Query tab.
Operator
Permission to set up and change replication settings but cannot work on administrative tasks (such as change license, change user permissions)
Public
Permission to audit and monitor replications, back up metadatas and change metadata settings (such as starting/stopping traces or changing email parameters for email notification).
SecurityAdmin
Permission to manage security, Does not normally need to change replication settings or work on creating new metadata.
See Create Login Dialog for more information about specific permissions and a comparison of the user roles. -
Click Create to create the new user.
Related Topics
User Settings Dialog
Create Login Dialog
Installing a Certificate
Client and Server Security
Options